Messages
Contents
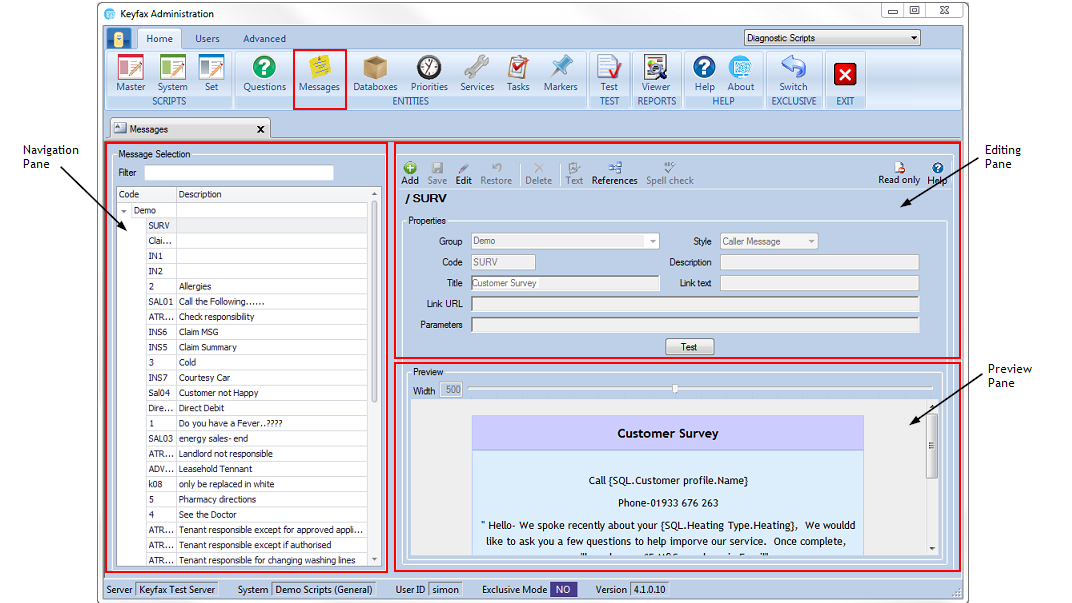
This shows the message selection, containing a list of the messages already set up and listed alphabetically by description with corresponding code.
Message selection
Select a message from the list to edit or select Add from the menu bar to create a new message.
Move multiple messages into a group by either holding shift whilst clicking to select a block of messages, or by holding ctrl whilst clicking to select multiple messages and then drag them into the desired group in the message selection list.
- Code - Message code
- Description - Message description
Filter
type in characters to search for messages with the specific text. As you type into the filter the list will update with messages matching the filter criteria selected. To view the messages within the category click on the to the left of the category title.
The Editing Pane
At the top above the properties the code and description of the message are shown in bold, the properties of the message are shown under this. If it's a new message these properties be empty and ready for input, if it's an existing message they will already be populated.
Properties
- Group - Messages are arranged into groups so that they can appear together in the message selection list.
When creating or editing a message, you can either select a group from the drop down list or type a name to create a new group.
- Code - the code for the message. This code may be numbers or letters and can be up to 15 characters. It is useful to make the code meaningful so that it has some identification when viewed within the scripts.
- Title - the message title displayed in the bar above the main body of text, as viewed by an operator. Messages provided in the model use the titles such as ‘Customer Survey’ in the above example.
- Style - a model set of styles are provided for messages. These vary the colour scheme, font and sizes. Choose the style for each message by selecting it from the drop down list. If you would like any amendments or additions to the styles you should contact your Keyfax Account Manager.
- Description - a short description of the message content that will be displayed in the message selection list in the navigation pane. This will also be the search criteria when using the filter and visible within the scripts to identify the message.
- Link text - you can add a button to messages linked to web pages or files within your network. The link text is the name that will be displayed on the button in the message, for example ‘Help’. There is space for 50 characters.
- Link URL - the location of the web page or file the button on the message will open. For web pages enter the URL e.g. http://www.domainname.com/page1.htm. For files, enter the network path e.g. FILE://\\\\servername\sharename\file1.doc.
- Parameters - where a URL contains parameters captured from a previous point, these can be added into this box to be added to the URL. For example: Google Maps contains post codes which would be added in here.
- Test - this enables any defined URLs, including bookmarked databoxes and any relevany parameters, to be tested.
Preview
Displays a preview of the selected message and any adjustments you may have made in the properties section of the editing pane.
- Width - moving the slider left or right changes the width of the Message.
Use the preview pane to see how changes you have made affect the appearance of the message for the operator.
Creating/Editing Messages
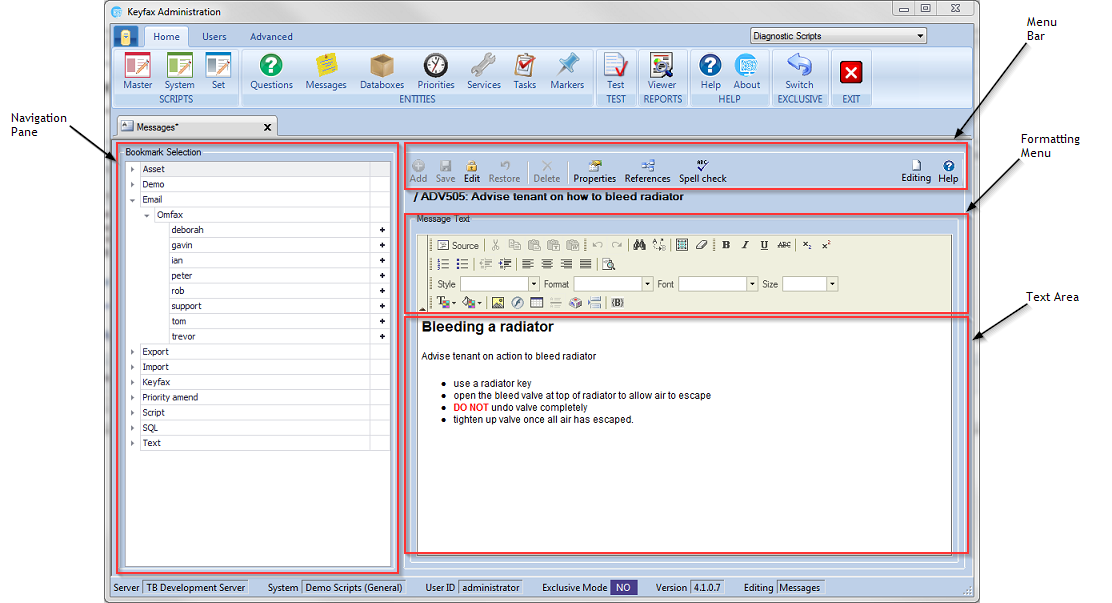
When a new message is created or edit has been selected on a current message you can click on the Text button to change the contents of the message.
Available databoxes are displayed in a list by group, databox and expression. These can be used as bookmarks in your messages. If the databox contains a value, that value will be displayed in place of the bookmark. They can be dragged into the message when you are editing it, or by clicking on the plus sign on the right of each line.
Formatting Menu
This menu works like the editing tools within word, allowing changes to the style, size and colour of the text, tables, numbered and bullet pointed lists as well as various formatting.
Source
The messages are created in HTML and selecting the source button allows the underlying HTML to be edited directly.
Text Area
The content of the message goes here. This will take the form of text and pictures.
Use the Text Area to enter the text of the Message and the Formatting Menu to format the text of the Message as required.

