Difference between revisions of "Aareon"
| (16 intermediate revisions by the same user not shown) | |||
| Line 1: | Line 1: | ||
| − | [https://www.aareon.co.uk/ Aareon] | + | ==Integrations== |
| + | Integration with [https://www.aareon.co.uk/ Aareon QL] enables Keyfax to be launched in repairs diagnostics or general enquiries mode. | ||
| + | Aareon QL supports integration with Keyfax for our Repair Diagnostics and Enquiries modules. | ||
| + | ===Keyfax Repair Diagnostics=== | ||
| − | + | '''QL calling Keyfax''' | |
| − | + | # Used to pick a SOR/Priority/Description amongst other details via scripting. | |
| + | # Passes in Keyfax company code, rent name & property address, tenancy sequence number, property code, tenancy type, order number. | ||
| − | + | '''Keyfax returning to QL''' | |
| − | + | # QL accepts back | |
| + | # Priority, SoR item (also checks for item INSP if so, mark as requiring a pre-inspection), quantity, fault description (which goes into message 1), additional info (which goes into message 2) | ||
At launch QL passes Keyfax the company code, name and property address, tenancy sequence number, property code, tenancy type and order number. | At launch QL passes Keyfax the company code, name and property address, tenancy sequence number, property code, tenancy type and order number. | ||
| Line 14: | Line 19: | ||
The integration gives Keyfax the ability to populate the following fields in QL Single Order Entry screen on submission of a diagnosed repair in Keyfax. | The integration gives Keyfax the ability to populate the following fields in QL Single Order Entry screen on submission of a diagnosed repair in Keyfax. | ||
| − | + | ; Repair Code : Populated with the chosen Keyfax Service | |
| − | + | ; Priority : Populated with the chosen Keyfax Priority | |
| − | + | ; Message Line 1 : Populated with the Keyfax Recorded Text | |
| − | + | ; Message Line 2 : Populated with the Keyfax Additional Info text | |
| − | + | ; Zero Value : Populates the tick box field zeroing the order value | |
| − | + | ; Recharge : Populates the tick box field *Requires QL version 4.2 or higher | |
| − | |||
| − | |||
| − | |||
| − | |||
| − | |||
The following added: QL v3.2 / InterView v4.1.5.x | The following added: QL v3.2 / InterView v4.1.5.x | ||
| − | |||
| − | |||
| − | |||
| − | |||
| − | |||
| − | + | ; Contractor Ref : Populated using fixed text by the Keyfax Administrator | |
| + | ; Work Type : Populated using fixed text by the Keyfax Administrator | ||
| + | ; Classification : Populated using fixed text by the Keyfax Administrator | ||
| + | ; SOR volume : Populated using fixed text by the Keyfax Administrator | ||
QL also checks for item INSP (Service) to mark as requiring a pre-inspection. | QL also checks for item INSP (Service) to mark as requiring a pre-inspection. | ||
[[File:ql3.png]] | [[File:ql3.png]] | ||
| − | |||
| − | |||
===Keyfax Enquiries=== | ===Keyfax Enquiries=== | ||
| − | + | '''KeyFax (Frontline - CRM)''' | |
| − | + | '''QL calling Keyfax''' | |
| + | #Used to pick a desired action to process | ||
| + | #Passes in Keyfax company code, rent name & property address, tenancy sequence number, property code, tenancy type, clientID (optional). | ||
| + | '''Keyfax returning to QL''' | ||
| + | #QL accepts back | ||
| + | #Enquiry Text (goes into Brief Description), Note which contains 3 classes (CLASS1=<code>, CLASS2=<code> etc) and the rest of the note goes into full description. | ||
| − | |||
| − | |||
| − | |||
| − | + | The integration gives Keyfax the ability to populate the following fields in the QL Contact Creation screen on submission of a diagnosed enquiry in Keyfax. Populating the Additional Classes allows Keyfax to 'trigger' a predefined workflow in QL. | |
| + | ;Additional Classes : Populated using a Keyfax Note | ||
| + | ;Brief Description : Populated using the Recorded Text | ||
| + | ;Full Desc : Populated using a Keyfax Note | ||
| + | [[File:ql4.png]] | ||
| − | + | ;Additional Classes : A class is a means of conveying data from Keyfax InterView to QL. 5 Classes are supported and the population of these Classes are defined using a Keyfax Note, shown below. | |
[[File:ql5.png]] | [[File:ql5.png]] | ||
| − | |||
| − | + | ;Brief Description : The Recorded Text is picked up from the export XML and placed in the ‘Brief Description’ field in the QL Contact Creation screen. By manipulating the recorded text in the Keyfax Administration tools this allows for a quick reference summary of the contact with the tenant, detailing Category and Topic chosen followed by any Script data considered relevant to the Keyfax administrator/organisation. | |
| − | + | ;Full Desc : The full description may contain any text required, including Databox bookmarks. The full description is also taken from a Keyfax Note, using the same Note created to pass the Additional Classes. | |
To allow QL to differentiate between Note text for the Additional Classes and Note text for the full description, a paragraph close mark-up (</p>) is required after the Additional Classes. | To allow QL to differentiate between Note text for the Additional Classes and Note text for the full description, a paragraph close mark-up (</p>) is required after the Additional Classes. | ||
| Line 71: | Line 72: | ||
[[File:ql_classes2.png]] | [[File:ql_classes2.png]] | ||
| + | == Setting up QL (Company Code)== | ||
| + | |||
| + | Setting the Company code tells Inter•View which configuration to use (e.g. to enable switching between Live/Test/Training/other). It is passed to [ShortProduct] at launch time and there must be a configuration file of the same name in Keyfax, e.g. if '''TopHousing''' was sent as the Company Code, Keyfax would need to be set to use a file named '''TopHousing_Config.xml''' with contents defined by your systems implementer. | ||
| + | |||
| + | This setting is is located in the '''HPM''' module under the '''KEYFAX_COMPANY''' parameter ID: | ||
| + | |||
| + | [[File:AareonParameters.jpg]] | ||
| + | |||
| + | In this example, Keyfax would need to be configured to use a file named '''CDHG41_Config.xml''' | ||
| + | |||
| + | == Launching from QL == | ||
| + | |||
| + | The following screenshots illustrate how to navigate the initial screens to the point [ProductName] is launched. The Aareon integration requires installation of the Keyfax Client: | ||
| + | |||
| + | ===Property Selection=== | ||
| + | |||
| + | [[File:screen10.png]] | ||
| + | |||
| + | [[File:screen20.png]] | ||
| + | |||
| + | ===Launching Inter•View=== | ||
| + | |||
| + | The relevant property details are displayed. Note that there may be any number of pop-up windows and alerts before you can proceed. Click to continue on each of these. | ||
| + | |||
| + | [[File:screen30.png]] | ||
| + | |||
| + | ==Known Issues== | ||
| − | Do not use a line break ( | + | Do not use a line break (<br/>) as QL cannot then differentiate and the full description will receive the Additional Class values and mark-up, shown below. |
[[File:ql7.png]] | [[File:ql7.png]] | ||
| Line 80: | Line 108: | ||
[[File:ql8.png]] | [[File:ql8.png]] | ||
| − | *Originally, QLx handled THREE classes. It is possible that older versions of QLx will not support more than 3 (possibly 5) - please check with Aareon. | + | *Originally, QLx handled THREE classes. It is possible that older versions of QLx will not support more than 3 (possibly 5) - please check with [https://www.aareon.co.uk/ Aareon]. |
Latest revision as of 11:00, 18 September 2018
Contents
Integrations
Integration with Aareon QL enables Keyfax to be launched in repairs diagnostics or general enquiries mode.
Aareon QL supports integration with Keyfax for our Repair Diagnostics and Enquiries modules.
Keyfax Repair Diagnostics
QL calling Keyfax
- Used to pick a SOR/Priority/Description amongst other details via scripting.
- Passes in Keyfax company code, rent name & property address, tenancy sequence number, property code, tenancy type, order number.
Keyfax returning to QL
- QL accepts back
- Priority, SoR item (also checks for item INSP if so, mark as requiring a pre-inspection), quantity, fault description (which goes into message 1), additional info (which goes into message 2)
At launch QL passes Keyfax the company code, name and property address, tenancy sequence number, property code, tenancy type and order number.
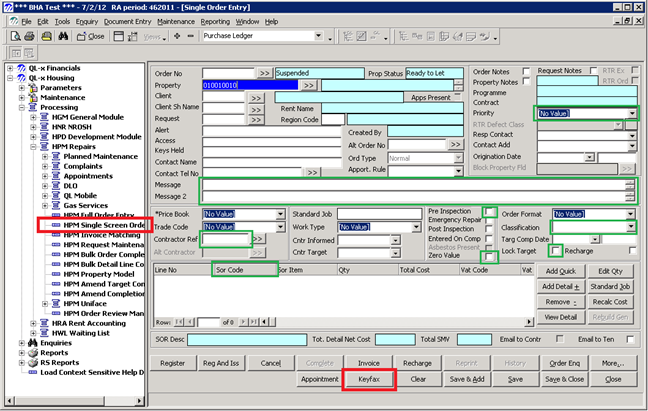
The integration gives Keyfax the ability to populate the following fields in QL Single Order Entry screen on submission of a diagnosed repair in Keyfax.
- Repair Code
- Populated with the chosen Keyfax Service
- Priority
- Populated with the chosen Keyfax Priority
- Message Line 1
- Populated with the Keyfax Recorded Text
- Message Line 2
- Populated with the Keyfax Additional Info text
- Zero Value
- Populates the tick box field zeroing the order value
- Recharge
- Populates the tick box field *Requires QL version 4.2 or higher
The following added: QL v3.2 / InterView v4.1.5.x
- Contractor Ref
- Populated using fixed text by the Keyfax Administrator
- Work Type
- Populated using fixed text by the Keyfax Administrator
- Classification
- Populated using fixed text by the Keyfax Administrator
- SOR volume
- Populated using fixed text by the Keyfax Administrator
QL also checks for item INSP (Service) to mark as requiring a pre-inspection.
Keyfax Enquiries
KeyFax (Frontline - CRM)
QL calling Keyfax
- Used to pick a desired action to process
- Passes in Keyfax company code, rent name & property address, tenancy sequence number, property code, tenancy type, clientID (optional).
Keyfax returning to QL
- QL accepts back
- Enquiry Text (goes into Brief Description), Note which contains 3 classes (CLASS1=<code>, CLASS2=<code> etc) and the rest of the note goes into full description.
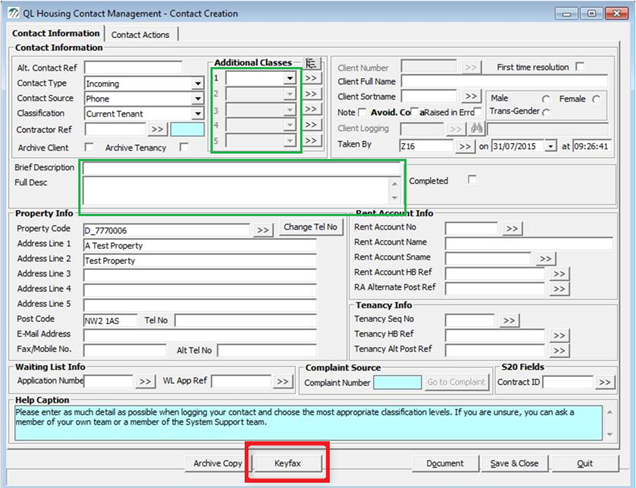
The integration gives Keyfax the ability to populate the following fields in the QL Contact Creation screen on submission of a diagnosed enquiry in Keyfax. Populating the Additional Classes allows Keyfax to 'trigger' a predefined workflow in QL.
- Additional Classes
- Populated using a Keyfax Note
- Brief Description
- Populated using the Recorded Text
- Full Desc
- Populated using a Keyfax Note
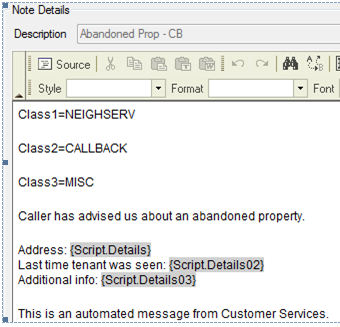
- Additional Classes
- A class is a means of conveying data from Keyfax InterView to QL. 5 Classes are supported and the population of these Classes are defined using a Keyfax Note, shown below.
- Brief Description
- The Recorded Text is picked up from the export XML and placed in the ‘Brief Description’ field in the QL Contact Creation screen. By manipulating the recorded text in the Keyfax Administration tools this allows for a quick reference summary of the contact with the tenant, detailing Category and Topic chosen followed by any Script data considered relevant to the Keyfax administrator/organisation.
- Full Desc
- The full description may contain any text required, including Databox bookmarks. The full description is also taken from a Keyfax Note, using the same Note created to pass the Additional Classes.
To allow QL to differentiate between Note text for the Additional Classes and Note text for the full description, a paragraph close mark-up (</p>) is required after the Additional Classes.
Setting up QL (Company Code)
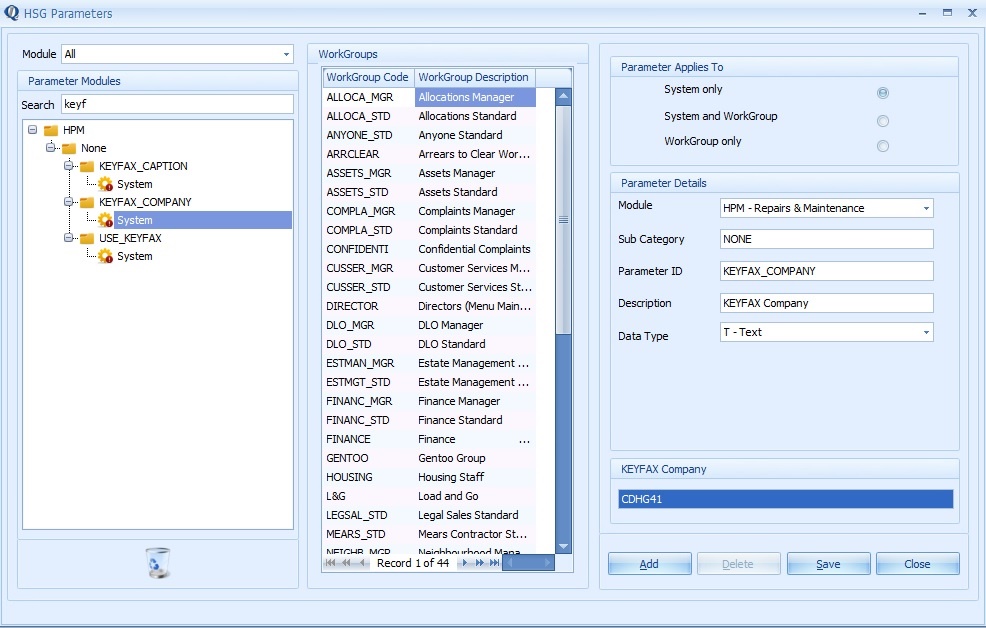
Setting the Company code tells Inter•View which configuration to use (e.g. to enable switching between Live/Test/Training/other). It is passed to [ShortProduct] at launch time and there must be a configuration file of the same name in Keyfax, e.g. if TopHousing was sent as the Company Code, Keyfax would need to be set to use a file named TopHousing_Config.xml with contents defined by your systems implementer.
This setting is is located in the HPM module under the KEYFAX_COMPANY parameter ID:
In this example, Keyfax would need to be configured to use a file named CDHG41_Config.xml
Launching from QL
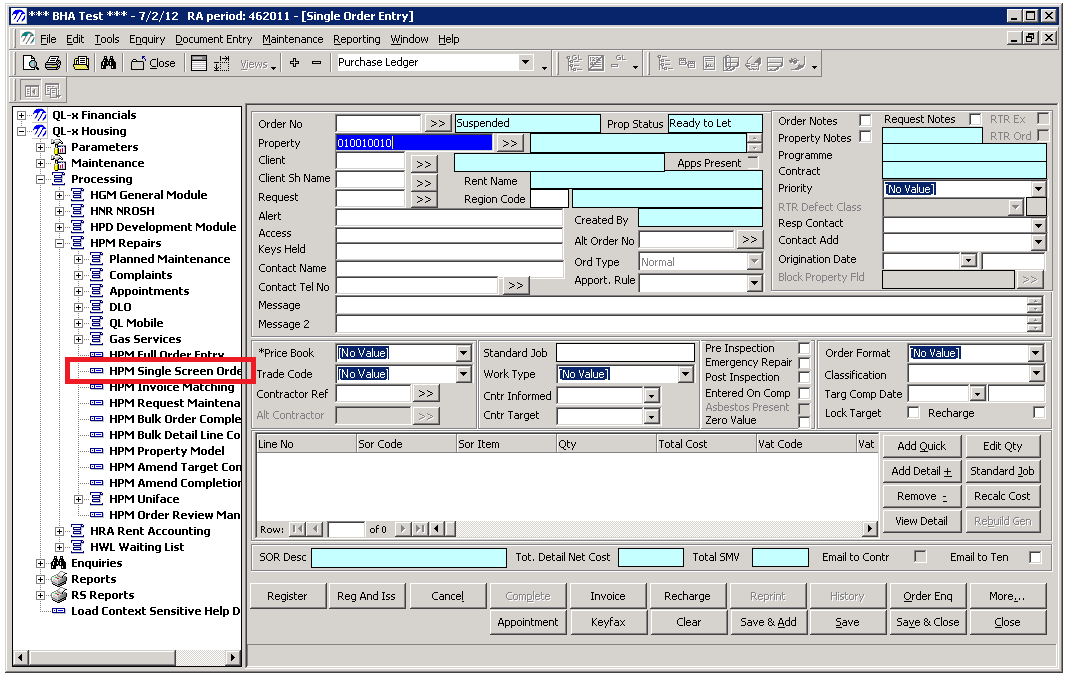
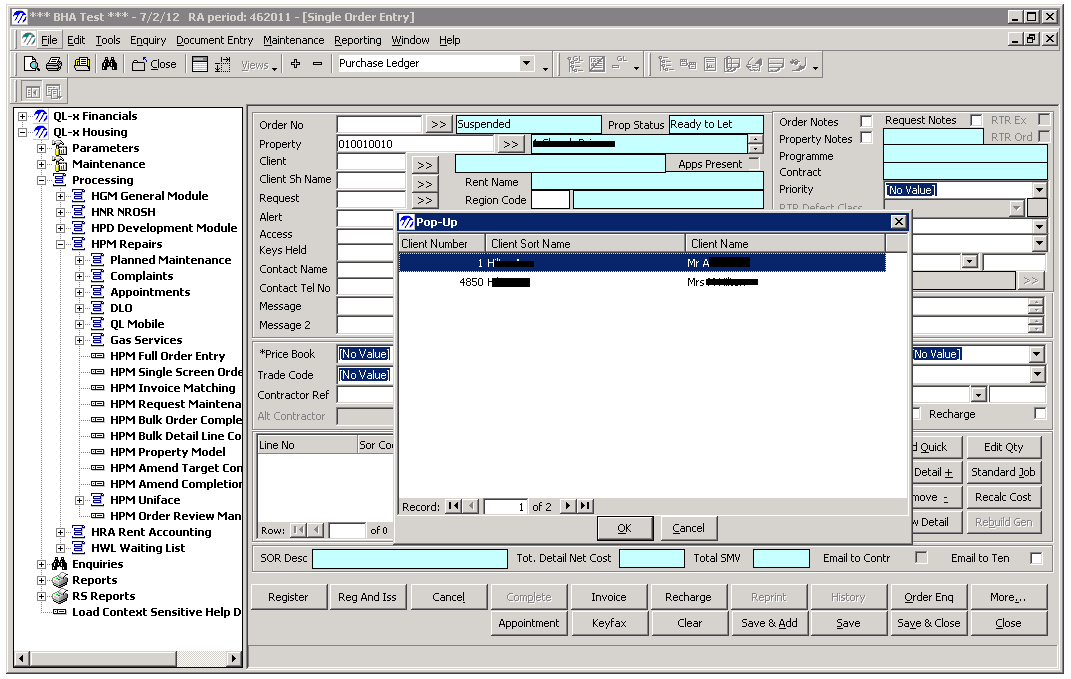
The following screenshots illustrate how to navigate the initial screens to the point [ProductName] is launched. The Aareon integration requires installation of the Keyfax Client:
Property Selection
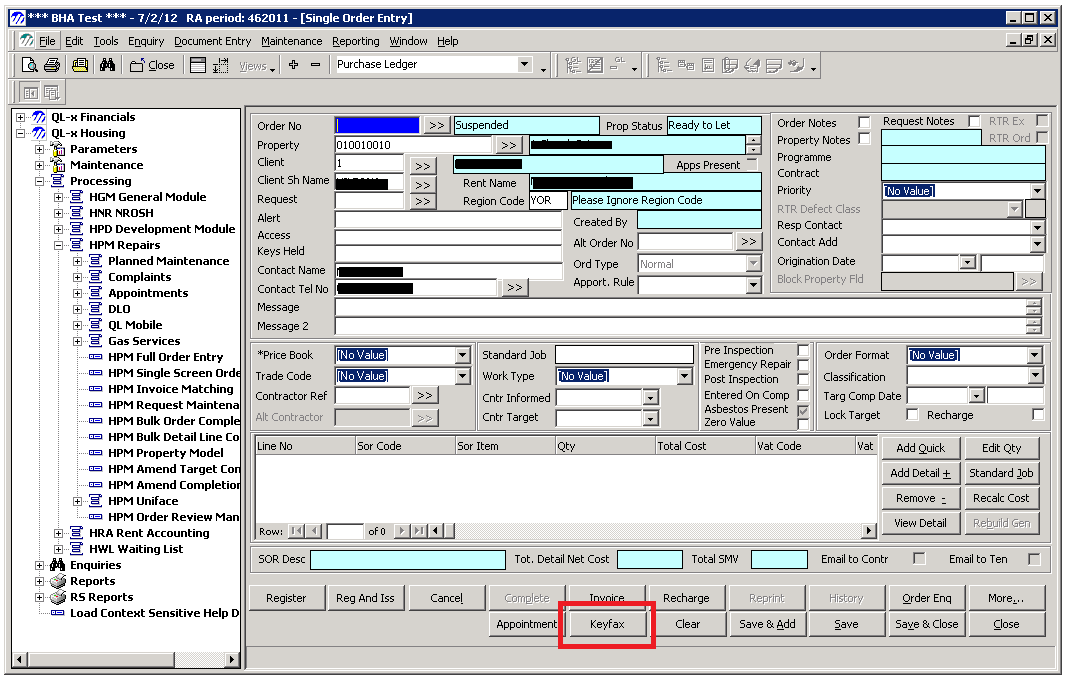
Launching Inter•View
The relevant property details are displayed. Note that there may be any number of pop-up windows and alerts before you can proceed. Click to continue on each of these.
Known Issues
Do not use a line break (<br/>) as QL cannot then differentiate and the full description will receive the Additional Class values and mark-up, shown below.
You can confirm that the HTML Markup is correct by clicking the Source button:
*Originally, QLx handled THREE classes. It is possible that older versions of QLx will not support more than 3 (possibly 5) - please check with Aareon.
