Difference between revisions of "Markers"
From Keyfax Wiki
| Line 1: | Line 1: | ||
| − | + | ==Markers== | |
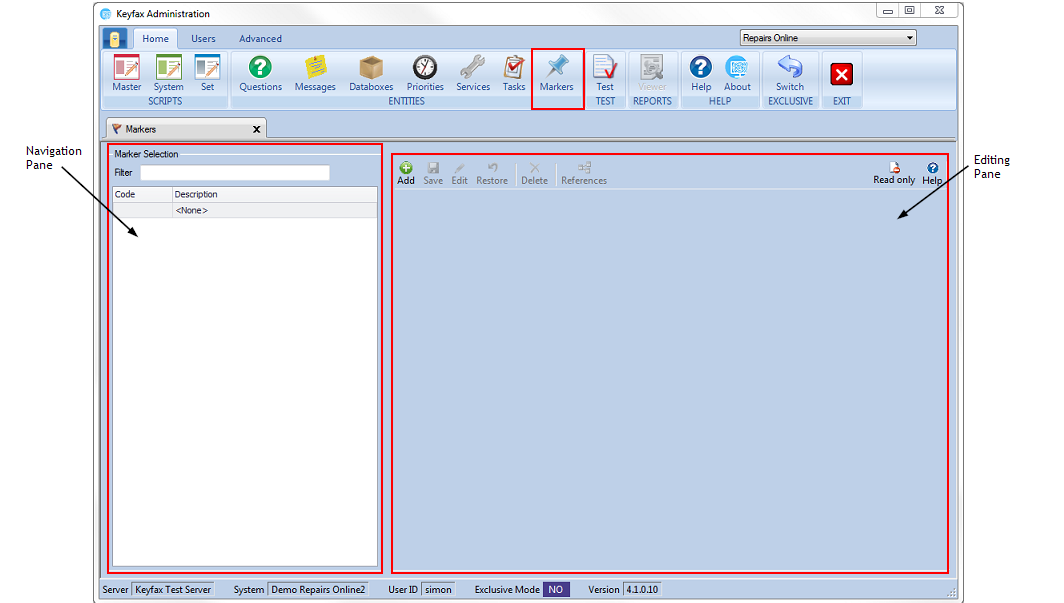
| + | Markers can be added into a scripts for reporting purposes. They can be used to record such things as avoidable contacts or any other matter that needs to be reported on. A standard report and dashboard item are provided to monitor the usage of this facility. Note that markers are stored permanently but only after submitting at the final (results) page of a script. | ||
[[File:markers41.png]] | [[File:markers41.png]] | ||
| + | ==The Navigation Pane== | ||
| + | Displays the marker selection, containing a list of the markers already set up, organised into groups and listed alphabetically: | ||
| + | *'''Marker Selection''' – finds a marker or multiple markers to view or edit: | ||
| − | + | *'''Filter''' - type in characters to search for markers with the specific text. You can search for text in the description or the code columns. As you type into the filter the list will update with markers matching your filter criteria. | |
| − | + | Move multiple Markers into a group by either holding Shift whilst clicking to select a block of Markers, or by holding Ctrl whilst clicking to select multiple Markers and then drag them into the desired group in the Marker Selection list. | |
| − | + | ==The Editing Pane== | |
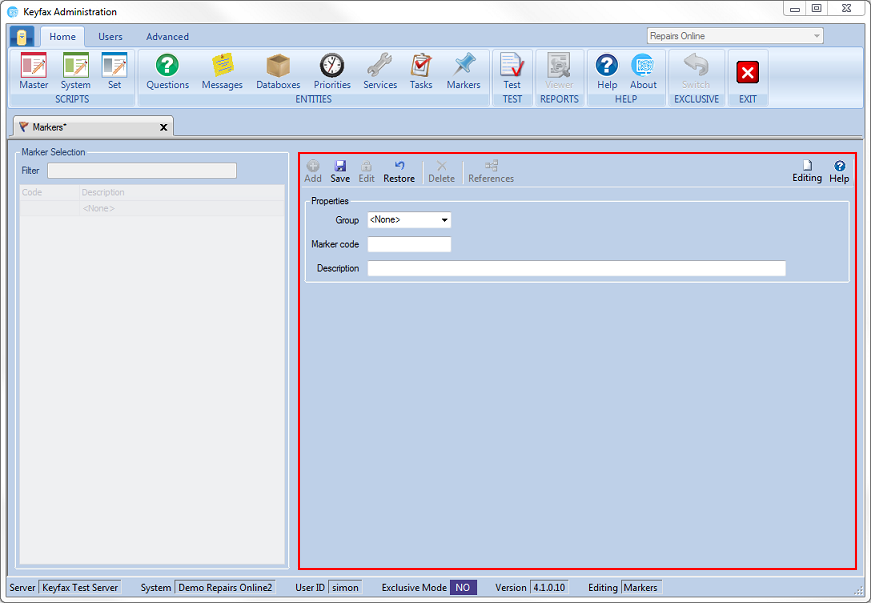
| + | Displays the properties of the selected marker: | ||
| + | Properties – enables you to view and/or edit the selected marker: | ||
| − | + | *'''Group''' - Markers are arranged into groups so that they can appear together in the marker selection list. | |
| − | + | When creating or editing a Marker, you can either select a group from the drop down list or type a name to create a new group. | |
| + | *'''Marker Code''' – the code for the marker. This code may be numbers or letters and can be up to 15 characters. It is useful to make the code meaningful so that it has some identification when viewed within a report or script. | ||
| − | + | *'''Description''' – a short description of the marker content that will be displayed in the Marker Selection list in the navigation pane. This will also be the search criteria when using the filter and visible within the reports to identify issues or reportable matters. | |
| − | |||
| − | |||
| − | |||
| − | |||
| − | |||
| − | |||
| − | |||
| − | |||
| − | |||
| − | |||
| − | |||
| − | |||
| − | |||
| − | |||
| − | |||
| − | |||
| − | |||
| − | |||
| − | |||
| − | |||
| − | |||
| − | |||
| − | |||
| − | |||
| − | |||
| − | |||
| − | |||
| − | |||
| − | |||
| − | |||
| − | |||
| − | |||
| − | |||
| − | |||
| − | |||
| − | |||
| − | |||
| − | |||
| − | |||
| − | |||
| − | |||
| − | |||
| − | Description – a short description of the | ||
[[File:markereditingpane41.png]] | [[File:markereditingpane41.png]] | ||
Latest revision as of 14:17, 30 January 2018
Markers
Markers can be added into a scripts for reporting purposes. They can be used to record such things as avoidable contacts or any other matter that needs to be reported on. A standard report and dashboard item are provided to monitor the usage of this facility. Note that markers are stored permanently but only after submitting at the final (results) page of a script.
Displays the marker selection, containing a list of the markers already set up, organised into groups and listed alphabetically:
- Marker Selection – finds a marker or multiple markers to view or edit:
- Filter - type in characters to search for markers with the specific text. You can search for text in the description or the code columns. As you type into the filter the list will update with markers matching your filter criteria.
Move multiple Markers into a group by either holding Shift whilst clicking to select a block of Markers, or by holding Ctrl whilst clicking to select multiple Markers and then drag them into the desired group in the Marker Selection list.
The Editing Pane
Displays the properties of the selected marker:
Properties – enables you to view and/or edit the selected marker:
- Group - Markers are arranged into groups so that they can appear together in the marker selection list.
When creating or editing a Marker, you can either select a group from the drop down list or type a name to create a new group.
- Marker Code – the code for the marker. This code may be numbers or letters and can be up to 15 characters. It is useful to make the code meaningful so that it has some identification when viewed within a report or script.
- Description – a short description of the marker content that will be displayed in the Marker Selection list in the navigation pane. This will also be the search criteria when using the filter and visible within the reports to identify issues or reportable matters.

