Difference between revisions of "Base Task Templates"
| Line 28: | Line 28: | ||
Select the appropriate template type. | Select the appropriate template type. | ||
| − | The Navigation Pane now contains the Bookmark Selection, comprising of the Databoxes available (See [[Admin_Tools_Manual#Databoxes|Databoxes]]), listed within their Categories. To open a Category click . To close down a Category click To add Bookmarks (Databoxes) to a Template, place the cursor on the Template at the required position and click the | + | The Navigation Pane now contains the Bookmark Selection, comprising of the Databoxes available (See [[Admin_Tools_Manual#Databoxes|Databoxes]]), listed within their Categories. To open a Category click . To close down a Category click To add Bookmarks (Databoxes) to a Template, place the cursor on the Template at the required position and click the + to the right of the Bookmark. |
| + | |||
| + | [[File:bookmarknavpane41.png]] | ||
| + | |||
| + | ====Email==== | ||
| + | To create a new Email Template select Email from the Base Template Type. The Editing Pane now contains the Email Details for the Template. Click on '''Edit''' and set out the Template as required. When complete click on '''Save''' . To undo changes back to the last save click on '''Restore'''. | ||
| + | |||
| + | [[File:bookmarkeditpane41.png]] | ||
| + | |||
| + | *'''Description''' – a Description detailing the Template | ||
| + | *'''Subject''' – text for the subject of the Email | ||
| + | *'''To''' – recipient for the Email | ||
| + | *'''From''' – sender of the Email | ||
| + | *'''CC''' – recipient for copy of the Email | ||
| + | *'''BCC''' – recipient for a blind copy of the Email | ||
| + | |||
| + | The Editing Pane also contains the Text Area for adding and editing the Template text and layout. Use the Formatting Menu to format the text and layout of the document as required. | ||
| + | |||
| + | To add Bookmarks (Databoxes) to the Template, place the cursor on the text area and click the + to the right of the selected Bookmark | ||
| + | |||
| + | To edit an existing Email Template, select the Template in the Navigation Pane to view it in the Editing Pane. Click on '''Edit''' and make any amendments required. When complete click '''Save''' . To undo changes back to the last save click on '''Restore'''. | ||
| + | |||
| + | ====Letter==== | ||
| + | |||
| + | ====Note==== | ||
Revision as of 14:40, 5 June 2018
Contents
Base Task Templates
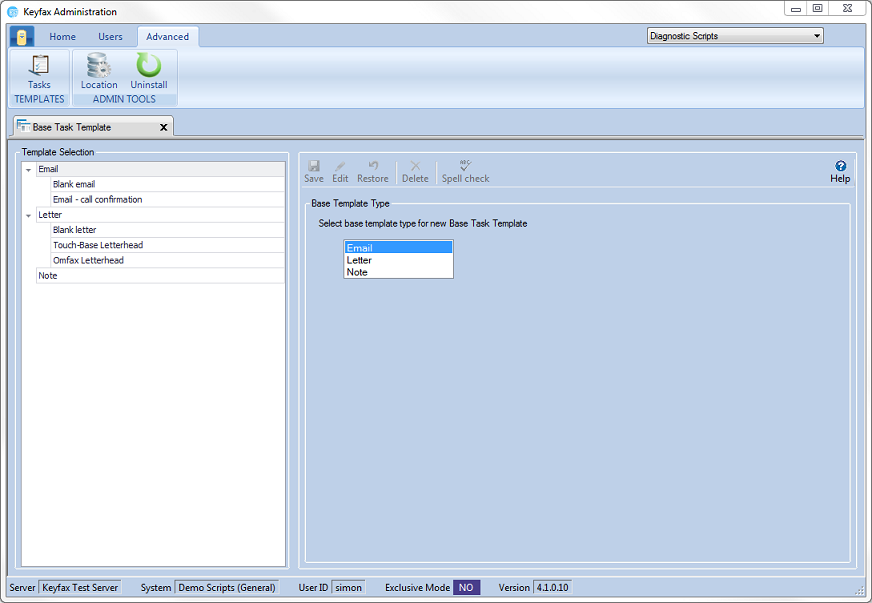
Keyfax Inter•View includes the facility to create Tasks – Call Logs, Mail Merge Letters and Emails – (see Section 2 for setting up Tasks) Select Task Templates from the sub-menu
This shows the Template Selection with various pre-defined Categories:
- Email – Email Templates used for Tasks, generating Emails from Scripts
- Letter – Letter Templates used for Tasks, generating Letters from Scripts
- Note – note Templates for generating notes to pass to Contact•View
- MISAction - note Templates for generating notes to pass to MIS
- MISEmail - Templates used for Tasks, generating Emails in MIS
- MISLetter - Letter Templates used for Tasks, generating Letters in MIS
MIS captions are only visible if MIS-AMS CRM integration is enabled.
Add Template
To add a new Template, highlight the appropriate Category. In the Editing Pane the Base Template Type contains a selection of Templates:
- Letter
- Note
Select the appropriate template type.
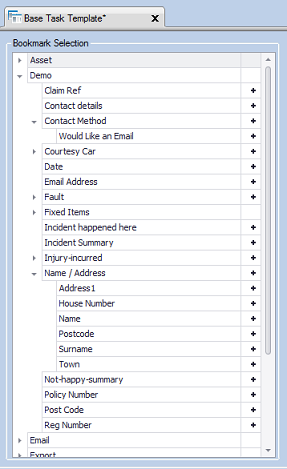
The Navigation Pane now contains the Bookmark Selection, comprising of the Databoxes available (See Databoxes), listed within their Categories. To open a Category click . To close down a Category click To add Bookmarks (Databoxes) to a Template, place the cursor on the Template at the required position and click the + to the right of the Bookmark.
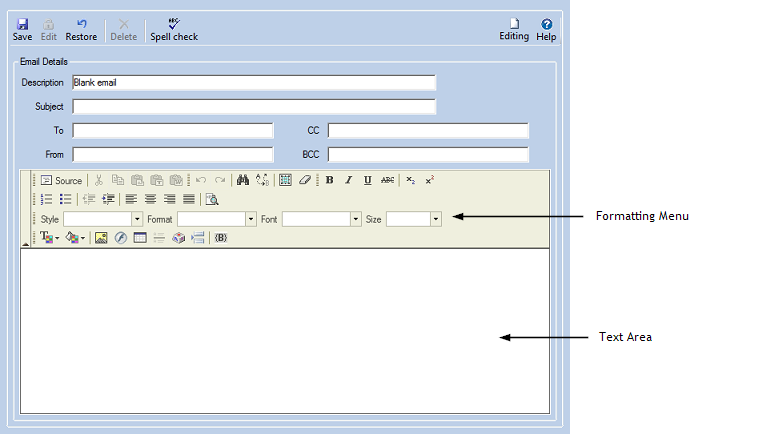
To create a new Email Template select Email from the Base Template Type. The Editing Pane now contains the Email Details for the Template. Click on Edit and set out the Template as required. When complete click on Save . To undo changes back to the last save click on Restore.
- Description – a Description detailing the Template
- Subject – text for the subject of the Email
- To – recipient for the Email
- From – sender of the Email
- CC – recipient for copy of the Email
- BCC – recipient for a blind copy of the Email
The Editing Pane also contains the Text Area for adding and editing the Template text and layout. Use the Formatting Menu to format the text and layout of the document as required.
To add Bookmarks (Databoxes) to the Template, place the cursor on the text area and click the + to the right of the selected Bookmark
To edit an existing Email Template, select the Template in the Navigation Pane to view it in the Editing Pane. Click on Edit and make any amendments required. When complete click Save . To undo changes back to the last save click on Restore.


