Difference between revisions of "Creating a Databox"
(→Import XML) |
(→SQL Query) |
||
| (5 intermediate revisions by the same user not shown) | |||
| Line 31: | Line 31: | ||
[[File:SQLdatabox.png]] | [[File:SQLdatabox.png]] | ||
| − | SQL Queries can be issued against any configured/compliant database in order to return a single row of data which internally is held as an XML packet and can be referenced by Expressions, e.g. Item. If an SQL Query returns more than one row, this is considered an error and the SQL query should be amended to ensure this cannot happen. It is good practice to always test for this eventuality in which case you will see this message: | + | SQL Queries can be issued against any configured/compliant database in order to return a single row of data which internally is held as an XML packet and can be referenced by Expressions, e.g. Item. |
| + | |||
| + | If an SQL query returns less than two columns, this will not result in an XML packet and the value of the databox will be the value returned and no expression is required. | ||
| + | |||
| + | If an SQL Query returns more than one row, this is considered an error and the SQL query should be amended to ensure this cannot happen. It is good practice to always test for this eventuality in which case you will see this | ||
| + | message: | ||
[[File:mr2.png]] | [[File:mr2.png]] | ||
| + | |||
| + | It should also be taken into consideration that if an SQL Query does not return nothing then any expressions against it will not run. | ||
Depending on the context, there may be various techniques to restrict results to a single row; typically this may use the '''TOP n''' clause. For example, to return a single row containing the current balance for the most recent tenancy record: | Depending on the context, there may be various techniques to restrict results to a single row; typically this may use the '''TOP n''' clause. For example, to return a single row containing the current balance for the most recent tenancy record: | ||
| Line 95: | Line 102: | ||
===Export XML=== | ===Export XML=== | ||
| − | + | [[File:exportxml.png]] | |
| − | |||
| − | |||
| − | |||
| − | |||
| − | + | *'''Type''' – select from the drop down list to specify how data is to be exported into the XML. The default options are: | |
| + | **'''General:''' Standard exporting of data into a node of the export XML. | ||
| + | **'''Service:''' Exporting into a Service Code node in the export XML. | ||
| + | **'''Custom:''' Creates a ‘Custom Key’ node in the Export XML. This is primarily used for backwards compatibility and for specific host systems that require data exported in a ‘Custom Key’ format. | ||
| + | **'''Audit:''' Used for exporting information that requires being audited or logged by Keyfax. | ||
| − | + | *'''Name''' – a descriptive name for the Databox. Use a meaningful description to identify the Databox in relation to its purpose for ease of recognition. | |
| − | + | *'''Append ‘recorded’ data''' - checking this option ensures that any data exported by the Databox is appended to any existing data. The data exported will be delimited by a semi-colon. | |
| − | + | *'''Empty bookmarks allowed''' – check this box if the Databox can be used in a task or message without being required to hold a value. | |
| − | + | *'''Read Only''' – check this box if the Databox will only be available to be read from when used within the Scripts. | |
| − | + | *'''XPath''' - the XPath details the node/element of the Export XML that is to be written to by the Databox. This has to be detailed in standard XPath format. | |
| − | + | *'''Test''' – test the expressions setup against the databox. | |
| + | *'''Help with Expressions''' – Help on constructing expressions to manipulate the data, which also includes examples of specific expressions and guidance on where to find extra help. | ||
===System Values=== | ===System Values=== | ||
| − | + | [[File:systemdatabox41.png]] | |
| − | System Value – these are internal to the system and provides access to a number of predefined values which are being added to all the time. You must select a value from the drop down list the type of value to be used: | + | *'''System Value''' – these are internal to the system and provides access to a number of predefined values which are being added to all the time. You must select a value from the drop down list the type of value to be used: |
| − | + | **'''DataViewURL''': This returns the DataView URL for the current configuration and should only be used when DataView is installed (requires a separate licence). The url returned will be formatted with the current users credentials each time the script is executed and the Databox value is referenced | |
| − | + | **'''Date: This returns the current date and time. | |
| − | + | **'''CallRef''': This returns the Order Id reference where a Service (SOR code) has been generated by the script. It can only be used as a Task bookmark as the Order Id is not generated until after the system results script and only if any Service has been generated by the script. | |
| − | + | **'''Services''': This returns details of all Services recoded in a script in an XML format | |
| − | + | **'''SriptPath''': This returns an HTML formatted list of questions and responses. | |
| − | + | **'''TaskCode''': This should only be used in a task template and returns the task action code for the 'current' task being processed. This is typically used to place the task code on the template as a visible 'stamp' to identify the source of a letter or email after it has been sent. | |
| − | + | **'''TaskID''': This returns the ContactView Task Id reference and is only relevant for installation with ContactView configured (requires a separate license). It can only be used as a template bookmark as the ContactView Task Id is not generated until after the system results script. | |
| − | + | **'''TotalCost''': This returns the total cost based on the Services generated by a script. The total cost is based on the recorded services and quantities with a configurable fee plus VAT. This is formatted to 2 decimal places. | |
A System Values Databox is Read Only. | A System Values Databox is Read Only. | ||
| + | ===Company Data=== | ||
| + | |||
| + | [[File:companydatabox41.png]] | ||
| − | + | *'''Group''' - when displayed in the Selection List in the Navigation Pane Databoxes are arranged into groups. Select a group from the drop down list to add the Databox to an existing group or type in a new group name to create a new group. | |
| + | |||
| + | *'''Name''' – a descriptive name for the Databox. Use a meaningful description to identify the Databox in relation to its purpose for ease of recognition. | ||
| + | |||
| + | *'''Values''' | ||
| + | **'''Name''' - This column details the description of the data | ||
| + | **'''Value''' - This column contains the actual value of the data to be used. This value may be used throughout the scripts and in databoxes, tasks and messages as bookmark values | ||
| + | |||
| + | [[File:companydataexample41.png]] | ||
| − | + | Company databoxes can contain multiple values. These can be added using the plus sign to the right of the values panel. | |
| − | |||
| − | |||
You can only remove rows of fixed data from a Company Data Databox if you are in Exclusive mode. | You can only remove rows of fixed data from a Company Data Databox if you are in Exclusive mode. | ||
| − | Special HTML characters &, <, > | + | ==Special HTML characters &, <, >== |
The system expects these values to be displayed within an HTML document and encodes certain reserved characters such that they appear as text and are not part of the underlying HTML. E.g. behind the scenes, & is encoded as &. | The system expects these values to be displayed within an HTML document and encodes certain reserved characters such that they appear as text and are not part of the underlying HTML. E.g. behind the scenes, & is encoded as &. | ||
If you are using these values in non-html fields e.g. email task address fields or explicitly want to generate these characters un-encoded then the encoding can be switched off by wrapping the value between 'html|' and '|'. e.g. "html|A&E@poole.nhs.uk|". | If you are using these values in non-html fields e.g. email task address fields or explicitly want to generate these characters un-encoded then the encoding can be switched off by wrapping the value between 'html|' and '|'. e.g. "html|A&E@poole.nhs.uk|". | ||
Latest revision as of 09:56, 19 March 2020
Contents
Creating Databoxes
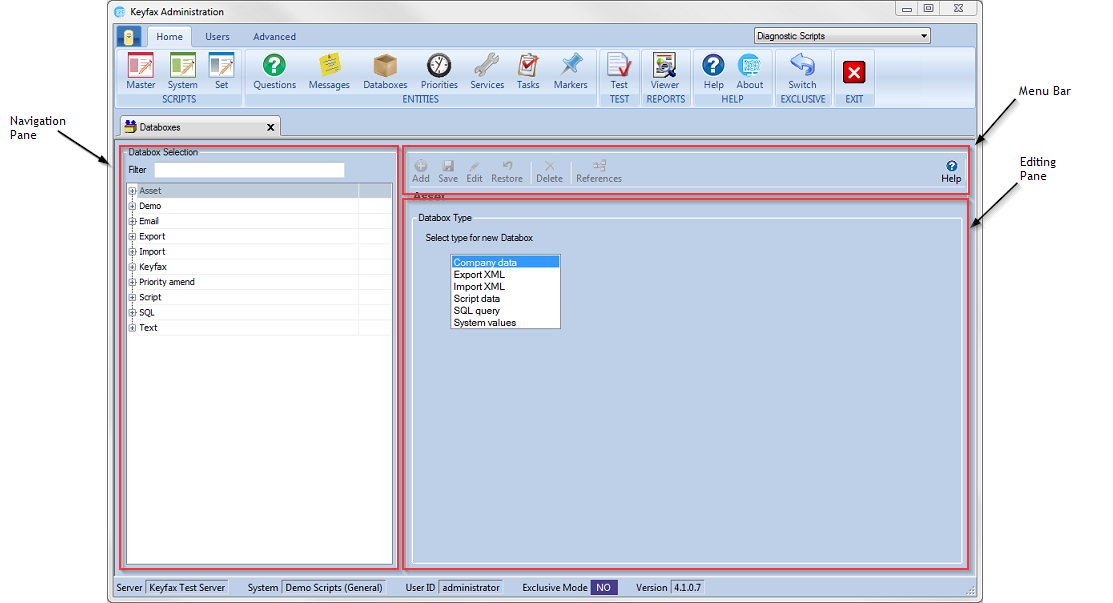
Select Databoxes from the entities menu to open a tab to manage your databoxes. The screen is divided into three sections. The navigation pane, menu bar and the editing pane. You can create a new databox by selecting a type from the list in the editing pane.
Databox Types
When the Databox page first appears, you can create a new Databox by selecting the type. You can choose to to ignore this and select an existing databox from the navigation pane. You can create a new Databox at any time by clicking on Add on the menu bar, where you will be presented with a list of databox types types in the editing pane The options are covered below.
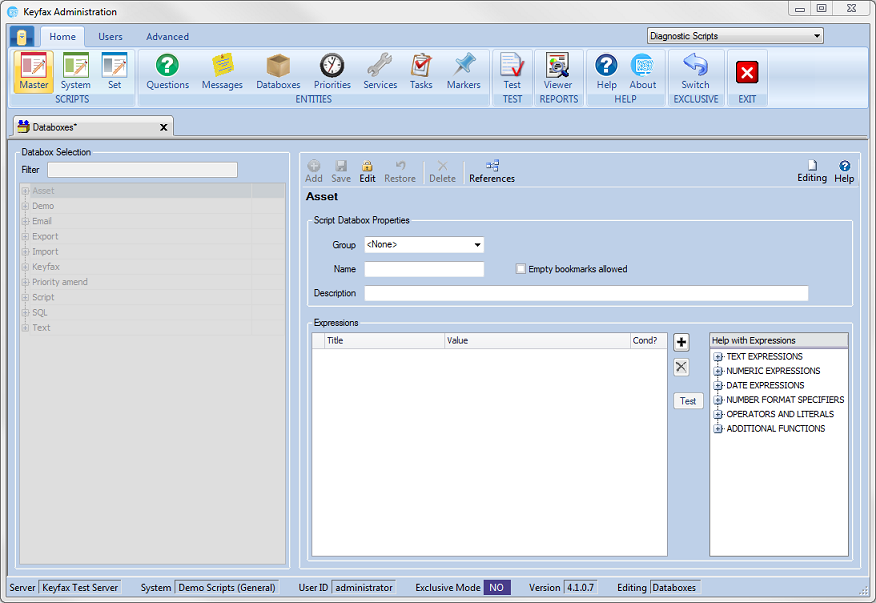
Script Data
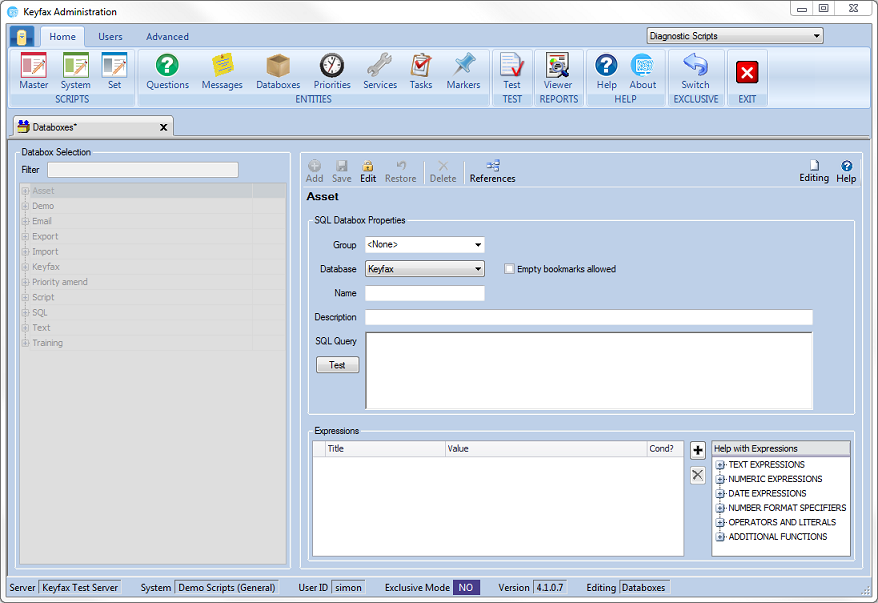
- Group - when displayed in the Selection List in the Navigation Pane Databoxes are arranged into groups. Select a group from the drop down list to add the Databox to an existing group or type in a new group name to create a new group.
- Name – a descriptive name for the Databox. Use a meaningful description to identify the Databox in relation to its purpose for ease of recognition.
- Empty bookmarks allowed – check this box if the Databox can be used in a task or message without being required to hold a value.
- Description - a short description of the Databox. This is displayed in the Databox Selection list in the Navigation Pane and is searchable using the filter.
- Expressions – these are covered in-depth in the Expressions section.
- Test – test the expressions setup against the databox.
- Help with Expressions – Help on constructing expressions to manipulate the data, which also includes examples of specific expressions and guidance on where to find extra help.
SQL Query
SQL Queries can be issued against any configured/compliant database in order to return a single row of data which internally is held as an XML packet and can be referenced by Expressions, e.g. Item.
If an SQL query returns less than two columns, this will not result in an XML packet and the value of the databox will be the value returned and no expression is required.
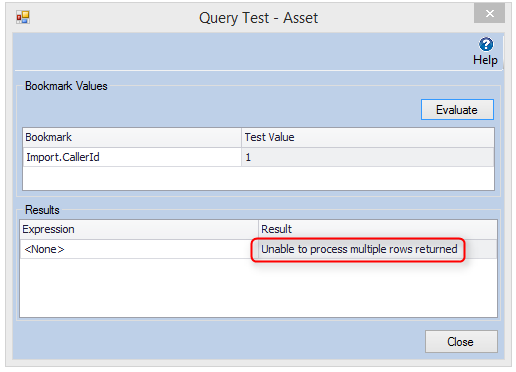
If an SQL Query returns more than one row, this is considered an error and the SQL query should be amended to ensure this cannot happen. It is good practice to always test for this eventuality in which case you will see this
message:
It should also be taken into consideration that if an SQL Query does not return nothing then any expressions against it will not run.
Depending on the context, there may be various techniques to restrict results to a single row; typically this may use the TOP n clause. For example, to return a single row containing the current balance for the most recent tenancy record:
SELECT TOP 1 CurrentBalance FROM Tenants WHERE TenantID = {Import.CallerId} ORDER BY TenancyStartDate DESC
- Database - the database drop-down list specifies which database the SQL Query Databox will read from. By default the Keyfax Database and Keyfax Data•View Database are available. If you are wishing to query SQL databases these will need to be added to Keyfax Support, to do this read-only login credentials will be needed, along with database name and location.
- SQL Query – This is where the SQL query is added. The Query normally includes a reference to another Databox, for example, a Databox obtaining the AssetID of a property. The maximum length of the query is around 1900 characters; this varies depending on the selected database name and the possible references to other Databoxes. Longer SQL queries should be set up as Stored Procedures in the database with EXECUTE permissions granted to the role: OMFAXROLE. The Databox SQL can then simply execute the stored procedure with the appropriate parameters.
Adopt the following naming convention for your stored procedures to ensure they will never conflict with existing or future items of the same name and hence ensure they are never overwritten/deleted by database upgrades: CUSTOM_storedprocedurename e.g. CUSTOM_GetRentBalance
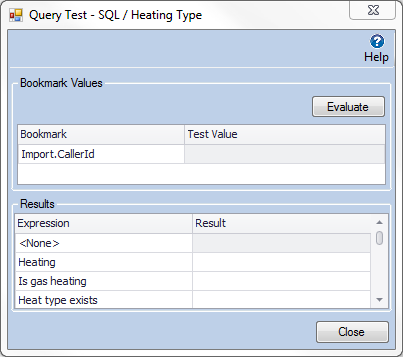
- Test - used to test the SQL Query against the Database that the Databox is connected to. Click on the TEST button, to open the SQL Query Test in a separate window, to allow the SQL statement to be tested.
- Bookmarks - those used in the SQL statement are listed in the Bookmark column. Enter a Test Value from the database to test the statement and click the Evaluate button. The result of the statement is displayed in the Results area.
- Expressions – these are covered in-depth in the Expressions section.
- Help with Expressions – Help on constructing expressions to manipulate the data, which also includes examples of specific expressions and guidance on where to find extra help.
You can use the SQL Query Test facility to check or test the behaviour of an Expression that you may want to use (for an SQL Query or any other Databox type that supports expressions). You can easily generate databox values, for example: SELECT 833728 or SELECT Mr F. Smith, 21 The Causeway, Bicester, Oxon, OX26 6AN
etc...
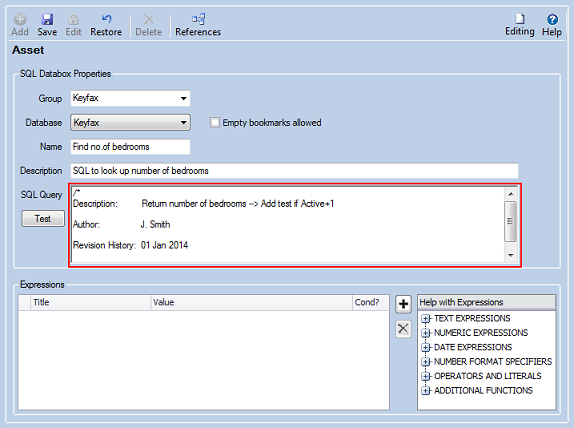
It is wise to include comments preceding the SQL Query itself. In this way, original author and details of any amendments can be recorded to aid support should problems arise:
When your script runs, every reference that made to a Databox will cause it to be re-evaluated, i.e. the SQL Query will be executed again. To ensure that this doesn't happen, you can 'shelve' results from a SQL Query by performing a Databox Read which is combined with a Databox Write to store results on the said 'shelf'. Any expressions against the 'shelved' databox contents will not cause the SQL to be rerun.
Stored Procedures
It is possible to create and run custom Stored Procedures to return data for use in your scripts. Care must be taken because EXECUTE permissions must be granted appropriately. For example, running SQL Tests in Admin Tools runs under a different user than the Script Engine at run time. Please contact support if this is a requirement.
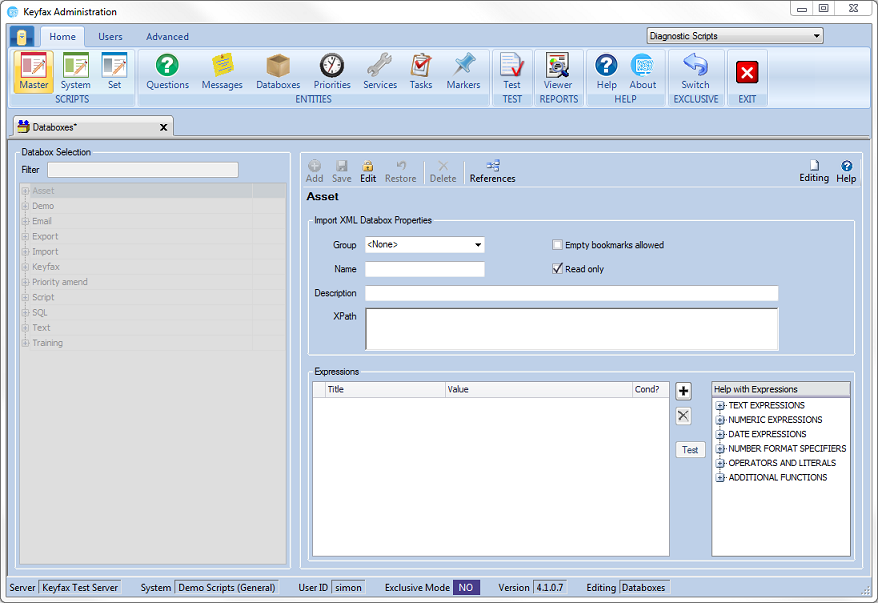
Import XML
- Group - when displayed in the Selection List in the Navigation Pane Databoxes are arranged into groups. Select a group from the drop down list to add the Databox to an existing group or type in a new group name to create a new group.
- Name – a descriptive name for the Databox. Use a meaningful description to identify the Databox in relation to its purpose for ease of recognition.
- Empty bookmarks allowed – check this box if the Databox can be used in a task or message without being required to hold a value.
- Description - a short description of the Databox. This is displayed in the Databox Selection list in the Navigation Pane and is searchable using the filter.
- Read Only – check this box if the Databox will only be available to be read from when used within the Scripts.
- XPath - the XPath details the node/element of the Import XML that is to be read from by the Databox. This has to be detailed in standard XPath format.
XPath is a language that describes how to locate specific elements, attributes or processing instructions in an XML document. It allows you to locate particular content within a document. XPATH treats an XML document as a logical ordered tree.
- Test – test the expressions setup against the databox.
- Help with Expressions – Help on constructing expressions to manipulate the data, which also includes examples of specific expressions and guidance on where to find extra help.
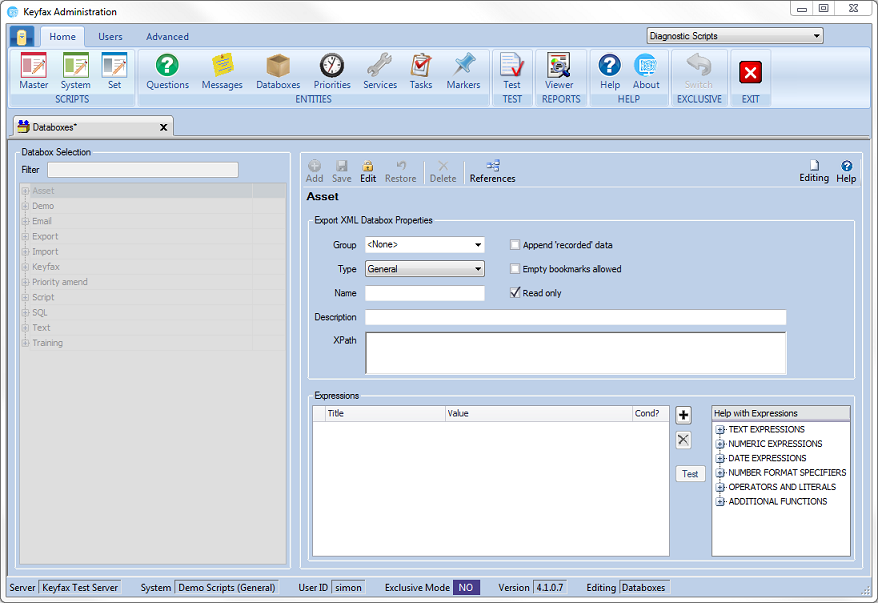
Export XML
- Type – select from the drop down list to specify how data is to be exported into the XML. The default options are:
- General: Standard exporting of data into a node of the export XML.
- Service: Exporting into a Service Code node in the export XML.
- Custom: Creates a ‘Custom Key’ node in the Export XML. This is primarily used for backwards compatibility and for specific host systems that require data exported in a ‘Custom Key’ format.
- Audit: Used for exporting information that requires being audited or logged by Keyfax.
- Name – a descriptive name for the Databox. Use a meaningful description to identify the Databox in relation to its purpose for ease of recognition.
- Append ‘recorded’ data - checking this option ensures that any data exported by the Databox is appended to any existing data. The data exported will be delimited by a semi-colon.
- Empty bookmarks allowed – check this box if the Databox can be used in a task or message without being required to hold a value.
- Read Only – check this box if the Databox will only be available to be read from when used within the Scripts.
- XPath - the XPath details the node/element of the Export XML that is to be written to by the Databox. This has to be detailed in standard XPath format.
- Test – test the expressions setup against the databox.
- Help with Expressions – Help on constructing expressions to manipulate the data, which also includes examples of specific expressions and guidance on where to find extra help.
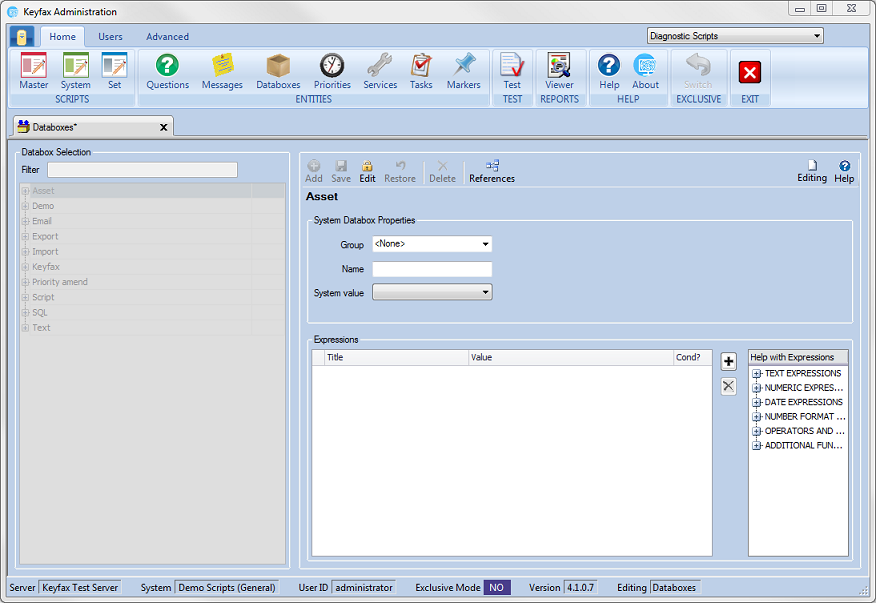
System Values
- System Value – these are internal to the system and provides access to a number of predefined values which are being added to all the time. You must select a value from the drop down list the type of value to be used:
- DataViewURL: This returns the DataView URL for the current configuration and should only be used when DataView is installed (requires a separate licence). The url returned will be formatted with the current users credentials each time the script is executed and the Databox value is referenced
- Date: This returns the current date and time.
- CallRef: This returns the Order Id reference where a Service (SOR code) has been generated by the script. It can only be used as a Task bookmark as the Order Id is not generated until after the system results script and only if any Service has been generated by the script.
- Services: This returns details of all Services recoded in a script in an XML format
- SriptPath: This returns an HTML formatted list of questions and responses.
- TaskCode: This should only be used in a task template and returns the task action code for the 'current' task being processed. This is typically used to place the task code on the template as a visible 'stamp' to identify the source of a letter or email after it has been sent.
- TaskID: This returns the ContactView Task Id reference and is only relevant for installation with ContactView configured (requires a separate license). It can only be used as a template bookmark as the ContactView Task Id is not generated until after the system results script.
- TotalCost: This returns the total cost based on the Services generated by a script. The total cost is based on the recorded services and quantities with a configurable fee plus VAT. This is formatted to 2 decimal places.
A System Values Databox is Read Only.
Company Data
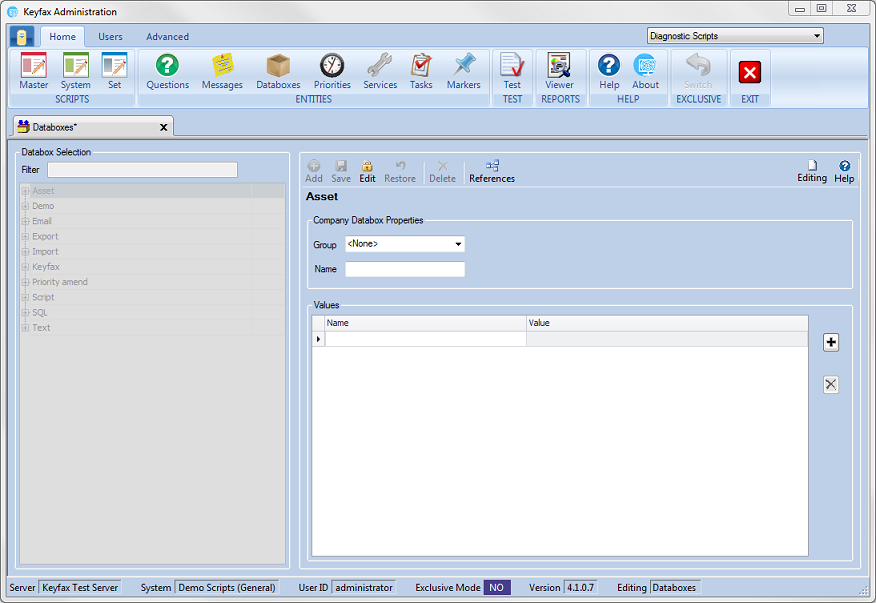
- Group - when displayed in the Selection List in the Navigation Pane Databoxes are arranged into groups. Select a group from the drop down list to add the Databox to an existing group or type in a new group name to create a new group.
- Name – a descriptive name for the Databox. Use a meaningful description to identify the Databox in relation to its purpose for ease of recognition.
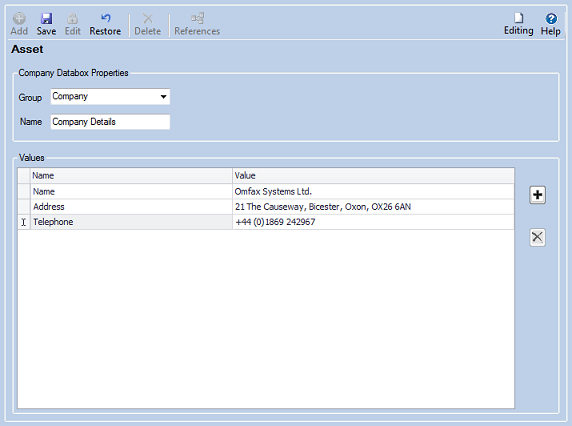
- Values
- Name - This column details the description of the data
- Value - This column contains the actual value of the data to be used. This value may be used throughout the scripts and in databoxes, tasks and messages as bookmark values
Company databoxes can contain multiple values. These can be added using the plus sign to the right of the values panel.
You can only remove rows of fixed data from a Company Data Databox if you are in Exclusive mode.
Special HTML characters &, <, >
The system expects these values to be displayed within an HTML document and encodes certain reserved characters such that they appear as text and are not part of the underlying HTML. E.g. behind the scenes, & is encoded as &.
If you are using these values in non-html fields e.g. email task address fields or explicitly want to generate these characters un-encoded then the encoding can be switched off by wrapping the value between 'html|' and '|'. e.g. "html|A&E@poole.nhs.uk|".
