Difference between revisions of "Using a Databox - Read"
From Keyfax Wiki
(Created page with "Home > Databoxes > Using a Databox - Read Using a Databox - Read Data held in a Databox can also be ‘read’. Reading from a Databox allows the data to be used elsewhere....") |
|||
| (4 intermediate revisions by the same user not shown) | |||
| Line 1: | Line 1: | ||
| − | + | Data held in a databox can be read by the system. This can be used so that the information can be: | |
| − | + | *Used in a message | |
| + | *Used in a task | ||
| + | *Read and assessed or manipulated | ||
| + | *Used in another databox | ||
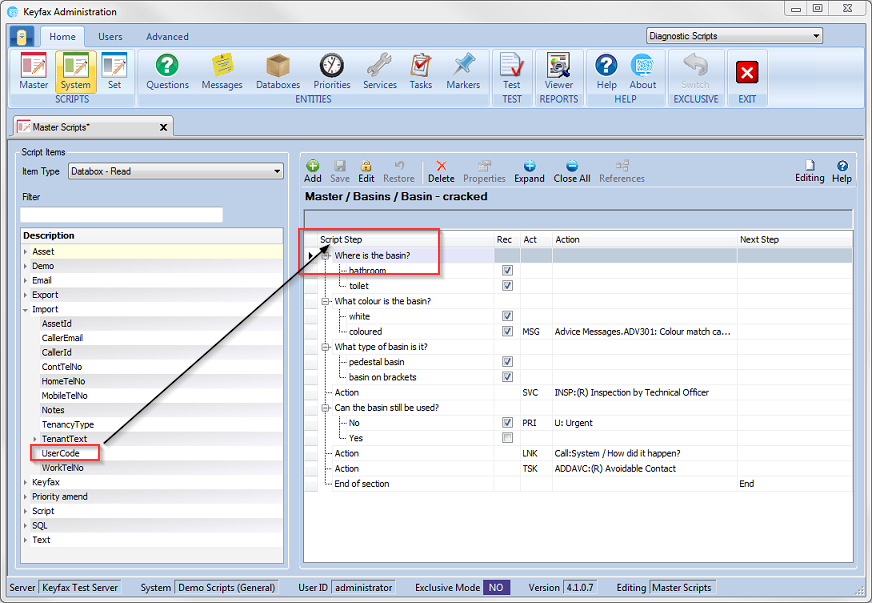
| − | + | With the Item type selected as '''Databox - Read''' drag the databox into the Script Step column as shown below. | |
| − | |||
| − | |||
| − | |||
| − | + | [[File:databoxread41.png]] | |
| − | + | The example here reads the '''Import.UserCode''' which will contain the username of whoever is using the system and writes it into the Additional Information element of the Export XML. In this case the user is '''Tom''' and therefore on the results screen this has populated the Additional Information field. | |
| − | + | [[File:39.png]] | |
| − | + | [[File:40.png]] | |
| − | |||
| − | |||
| − | |||
| − | |||
| − | |||
| − | |||
| − | + | [[File:41.png]] | |
Latest revision as of 14:03, 21 February 2018
Data held in a databox can be read by the system. This can be used so that the information can be:
- Used in a message
- Used in a task
- Read and assessed or manipulated
- Used in another databox
With the Item type selected as Databox - Read drag the databox into the Script Step column as shown below.
The example here reads the Import.UserCode which will contain the username of whoever is using the system and writes it into the Additional Information element of the Export XML. In this case the user is Tom and therefore on the results screen this has populated the Additional Information field.


